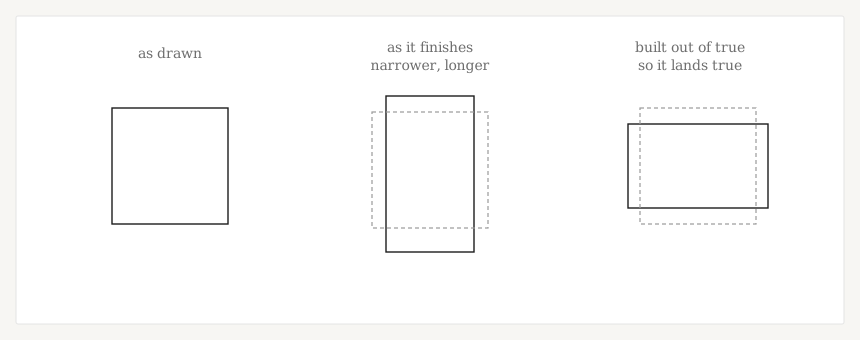
A shape sewn in thread does not finish the size it was drawn. Thread under tension pulls the fabric in one direction and the stitching pushes it out in another, so a circle digitized as a true circle comes off the machine slightly oval. Compensation is building the shapes out of true on purpose, so they land true.
Pull and push are not the same thing
They are usually mentioned together and often treated as one adjustment. They act on different axes and they are corrected differently.
Take a satin column, where the stitches run across it from one side to the other. Pull acts along the direction the stitches run, drawing the two sides toward each other so the column finishes narrower than drawn. Push acts perpendicular to that, extending the column at its ends. Wilcom puts it as stitches pulled inward along their width and pushed outward along their length.

| Pull | Push | |
|---|---|---|
| What happens | Thread tension draws the fabric inward as the stitch sets | Stitching displaces fabric outward along the direction it is running |
| Axis | Along the direction the stitches run | Perpendicular to it, at the ends of the run |
| Effect on the shape | Finishes narrower than drawn | Finishes longer than drawn |
| Correction | Build the shape wider than drawn | Pull the ends back short of the drawn edge |
| Worst on | Knits, stretch fabric, long satin columns | Dense fills and long stitch runs |
A circle shows both at once, which is why it is the standard test shape. It narrows across the stitch direction and grows along it, and the result is an oval whose long axis tells you which way the stitches were running.
What compensation actually changes
It does not stop pull or push. Nothing does — they are what thread does to cloth. Compensation changes the digitized geometry so that after the expected distortion the finished embroidery lands closer to the intended shape and the intended edge relationships.
So the shape in the file is deliberately not the shape you want on the garment. That is not an error — it is an allowance, and a design that looks perfectly true on screen is often the one that will not finish true.
Satin, fill and run do not behave the same
This is where the sources are most interesting, because two authorities emphasize different things.
- Satin. Wilcom describes satin as showing the pull effect most visibly — pulling in along the sides and pushing out at the ends, especially in long or narrow columns. The distortion happens across a narrow span, so it shows up immediately at the edges.
- Fill and tatami. Wilcom notes tatami shows less of it overall but is still affected. The educator John Deer takes the other view, describing push and pull as affecting fills more dramatically, because a fill covers a large area and the distortion accumulates across it.
- Run stitches. None of the documentation reviewed applies pull compensation to an ordinary run in the way it applies to satin and fill, and the concept does not carry over: a run has no filled width to contract across. Do not move a satin or fill compensation value onto an outline run and expect it to mean anything.
Those first two readings are not really in conflict, and our reading of why — this is our interpretation rather than anything the vendors have reconciled between themselves — is that they are measuring different things. Wilcom is describing how visible the effect is at the edge of a narrow column. Deer is describing how much total distortion builds up over a large area. Both can be true of the same design, and the second reading is the one that dominates distortion across a jacket back.
Why the same file behaves differently on different fabric
The geometry in the file does not change from one garment to the next. How much the material gives underneath it does.
Wilcom states the dependency directly: knits stretch more than wovens, so compensation has to be increased to account for the extra movement. Deer makes the same point from the other end, contrasting denim, which needs much less, with stretchy terry cloth, which needs much more. Hatch builds it into the product — the fabric you select applies a calculated amount of compensation automatically.
Stretch is the main variable, but stability, thickness, loft and how well the piece is supported and hooped all feed into the same system. That is why there is no per-fabric compensation number worth publishing: fabric changes the whole system rather than mapping onto a single figure.
What your software calls it
Compensation is not one setting with different numbers in it. The packages implement genuinely different models, which is the practical reason a value someone quotes you may be meaningless in your program. Before you act on a figure, it is worth knowing what that program’s number actually measures.
| Software | How it is handled | What you adjust | Published values? |
|---|---|---|---|
| Wilcom EmbroideryStudio | Applied per object | A compensation control in object properties | No |
| Hatch | Auto Fabric calculates it; manual override kept | “Overstitching”, per object | No |
| Embrilliance | Minimum / Percent / Maximum | A percentage, capped by a maximum | Suggests a small percentage, around 2–3% |
| Melco DesignShop | Auto-Compensate on by default; can be turned off | “Boldness”, as a percentage or in points, tunable by stitch-width range | No general figure |
| Ink/Stitch | No equivalent numeric control | The shape itself — cut short where push is expected, enlarge where pull is | No |
So how much is right?
There is no universal amount, and the strongest evidence for that is the documentation itself: Wilcom, Hatch and Ink/Stitch all explain the mechanism carefully and publish no value at all.
The right allowance depends on several things at once:
- the width of the object — a narrow satin and a wide one are not the same problem
- the stitch type, and the direction it runs relative to the shape
- the fabric, and how much it moves under the needle
- thread weight, machine tension, and the support under the garment
- the finished size the design is built for
It is also set per element, not once for the design, and the software agrees: Hatch keeps a manual per-object override on top of its fabric preset, and Wilcom applies it at object level. The value that makes a 2 mm satin border land correctly will visibly distort a 10 mm fill in the same logo.
What published figures do exist are indexed to geometry rather than offered as a global setting. As one worked example, John Deer publishes a graduated scale in which a 2 mm column carries about 0.15 mm of pull compensation, increasing with width to about 0.3 mm at 7 mm, and handles push by pulling inputs back roughly one stitch (about 0.4 mm), or about two stitches where an outline follows. That is one educator’s published method, tied to column width and to his own workflow — not an industry standard, and not a setting to copy into another program, and not a substitute for a sew-out on the actual fabric.
If a supplier quotes you a single compensation figure as a fixed setting they apply to everything, that is worth asking about.
How to spot an uncompensated file
You are looking at the finished garment, not the file. Four things give it away:
- Outlines sitting beside their own fill rather than on it, with a sliver of fabric showing along one side. The single most common sign.
- Circles and rounded letters reading as ovals, consistently in the same direction across the design.
- Gaps at the ends of satin columns, where the column has been pushed past the shape it was meant to fill.
- The design measures correctly but looks wrong. Overall dimensions are fine because the distortion is at object level, not design level.
The last one matters when you are deciding whether to argue with your supplier. A design can be exactly 3.5 inches wide as ordered and still be an uncompensated file.
When there is too much of it
Less discussed, and it happens — applied globally, carried over from a heavier fabric, or stacked on a setting the software was already applying. What you may see:
- satin columns finishing wider and heavier than they were drawn
- borders crowding or swallowing the shapes they surround
- objects visibly overlapping where they were meant to meet
- small lettering thickening, with counters closing up
- thread build-up along edges that should be clean
As with the signs of too little, each of these has other possible causes. They point at compensation; they do not prove it.
What compensation cannot fix
It is a dimensional allowance, not a general-purpose control for moving an edge until the sew-out looks right. Where the real cause is movement or construction, adding more of it creates a second problem without solving the first.
- Loose or inconsistent hooping, or unsuitable support. If the garment is not held the same way each time, no fixed allowance can be right.
- Too much density. Compensation corrects position, not the stiffness or puckering that comes from overloading an area.
- Resizing. Compensation is baked into the shapes at the size they were built. Scale the finished stitch data and it is wrong again. Where the software still holds the objects, it may be able to rebuild them — which is not the same operation.
- Missing underlay. If the fabric was never held still, no amount of compensation makes the shape land where it should.
- Artwork carrying more detail than the finished size can hold, or the wrong stitch type for the element. Both are construction problems.
- A machine or frame issue. Play in the frame is not a digitizing setting.
Compensation, underlay, backing and density
Four controls, often confused, doing four different jobs. Hatch’s documentation makes the relationship explicit: underlay, and appropriate backing and topping, can reduce the push and pull effect in the first place. Compensation accounts for what is left.
So support reduces the distortion and compensation allows for what remains — a direction of travel rather than anything you can calculate exactly. Density is separate again: a heavily packed object pulls harder and changes what the allowance has to cover, but adding density never substitutes for compensation, and adding compensation never repairs an over-dense object.
Which underlay a fabric wants, and what it prevents. Underlay reference →
What the density number measures, and which way it runs. Stitch density →
Choosing the material under the garment. Stabilizer & backing →
Reading a compensation problem
Compensation is a dimensional matter — the object finishes a different size than it was drawn. Whether two objects meet correctly on the finished piece is registration, and that has a wider set of causes than this one.
| What you see | Could compensation be involved? | Also check |
|---|---|---|
| Satin consistently narrower than intended | Possibly too little | Column width, fabric, underlay, density |
| Fabric showing between a fill and its outline | Possibly | Fabric movement, sequence, object construction |
| Circles and round letters finishing oval | The classic signature | Stitch direction, fabric |
| Edges overlapping further than drawn | Possibly too much | Object construction, finished size, stacked settings |
| Small lettering thickening or closing up | Possibly too much for the letter height | Letter height, column width, stitch type |
| Result changes unpredictably between garments | Unlikely to be the whole explanation | Hooping, support, machine setup |
| Only cap sew-outs fail | Do not treat it as a general compensation problem | Cap structure, frame and sequence |
Working out whether an offset is compensation or something that moved. Why outlines don’t line up →
Caps are a separate system. A curved, seamed panel in a cap frame introduces variables a flat garment does not, and a gap between an outline and its fill there can be drift rather than compensation.
Telling them apart on a cap. Why cap designs drift →