A jump and a trim are not the same thing, and treating them as one explains most of the confusion around this. A jump is a movement — the machine travels from one place to another without sewing a normal connecting line of stitches. A trim is a separate instruction to cut the thread. If a jump happens and no trim executes, the thread stays connected across the gap, and that carried thread is what you see lying on the garment.
Which means the loose thread is not the jump. It is what a jump leaves behind when nothing cuts it. That distinction matters, because it opens up the answer most pages skip: the fix is not always a trim.
Connectors: what actually joins two objects
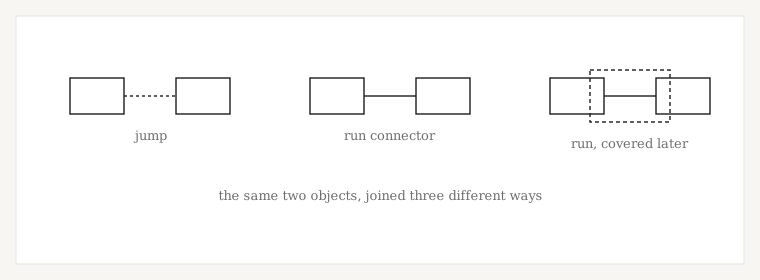
Embroidery software does not really think in jump stitches. It thinks in connectors — whatever joins the end of one object to the start of the next. Both Wilcom and Hatch model it this way, and a connector can be one of two things.
A jump
The machine moves without laying a connecting line of stitches into the design. The thread is still carried between the two points, which is exactly why it shows if nothing cuts it.
A run
Stitches actually walk from A to B. Hatch also calls these walk stitches. There is no floating thread — but there are now stitches in the garment, so this only helps where they will not be seen.
A trim sits outside that pair. It is not a third kind of connector; it is an instruction to cut, which the software can attach around a connector. And a travel run is narrower still: Wilcom uses the term specifically for runs that connect segments within a filled object, which are “usually covered by fill stitches when the object is stitched out.” Practitioners often use “travel” more loosely for any hidden connection, so it is worth knowing the narrower meaning exists.
The words differ between packages, which is its own source of confusion:
| Concept | Wilcom | Hatch | Ink/Stitch |
|---|---|---|---|
| What joins two objects | Connector | Connector | — |
| Move without stitching | Jump | Jump | Jump stitch |
| Stitched connection | Run connector | Run, or walk | Running stitch |
| Inside a fill | Travel run | — | — |
| Cut instruction | Trim | Trim | Trim after |
| Path optimization | Connector settings | Closest Join, Branching | Optimize routing |
A trim is not automatically the fix
This is where most published advice goes wrong. Trims get treated as a quality marker, as though a well-digitized file is one that cuts as often as possible. The software vendors say close to the opposite.
Ink/Stitch’s documentation, on its own trim command: “Do not use this option when you can optimize routing instead. Cutting threads should be avoided as much as possible.” Hatch is more specific about when: “When the connecting run is hidden beneath another object, it is more efficient to use a connecting run rather than a trim and tie-off.” And Wilcom documents turning automatic trimming off entirely as a legitimate setting — useful, it says, when trimming causes the machine to slow down or the needle to lose the thread.
The reason is mechanical rather than aesthetic. A trim is never just a cut: the thread has to be secured before it, secured again when stitching restarts after it, and somebody removes the tail afterwards. Each one costs machine time and adds stitches. Practitioners also report that heavy trimming brings more thread breaks and birdnesting — that part is widely said rather than vendor-documented, so treat it as experience rather than specification.
None of which makes trims bad. A trim that removes a thread you would otherwise see is doing its job. It is the ones serving no purpose that cost you.
When a design should trim
Where the connection cannot sensibly be hidden. Separated letters, isolated elements, a move across an open area of the garment, and any connector that nothing later in the sequence is going to cover. Hatch names lettering directly — letters frequently carry connecting stitches between characters, and trimming is how those come out.
What decides it is visibility rather than distance alone. Two figures from the software are worth knowing, as long as they are read for what they are. Hatch’s automatic trim option defaults to triggering on connectors of about 3 mm or longer. Wilcom notes separately that connectors shorter than about 3 mm are usually not visible in the finished embroidery — while adding that a smaller value may be wanted where the thread contrasts sharply with what is behind it.
So 3 mm is a software default and a visibility observation, not an embroidery rule. It is not “trim anything longer than 3 mm”. A 6 mm connector that a later fill covers completely needs no trim at all, and a 2 mm connector in bright thread on a pale garment might.
Sequencing decides most of it
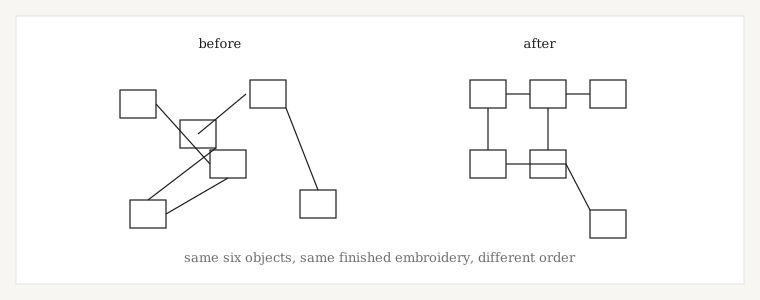
The most useful answer to “should this be trimmed” is often that it should not have been there. The order objects sew in determines how far the machine travels between them, how many of those journeys cross open fabric, and how many end up needing a cut.
Both major packages ship tools for exactly this. Hatch has Apply Closest Join, which sets the end and start points of same-color objects as close together as possible, and Branching, which builds objects into an efficient stitch path. Wilcom exposes connector behavior per object alongside separate distance triggers for trims and tie-offs.
Reading those features together, our own way of putting it is that good sequencing removes the need for the trim rather than trimming itself. That phrasing is ours; what the vendors publish is the tooling and the efficiency argument behind it. It is also not a rule that every design should minimize trim count at all costs — some designs genuinely need a lot of them.
Thread between letters
The most common version of this question, and it has no single answer. A lettering object can carry connectors between characters, and whether a given one stays a run, gets hidden, stays a jump or gets cut depends on letter spacing, how the lettering is built, whether anything sews over the connection afterwards, and what the machine does with the file.
Widely spaced block letters on open fabric usually want trims. Script that genuinely connects does not — the connection is part of the letterform. Tight lettering with short connectors that sit under the following character is where cutting every one adds work and removes nothing anybody would have seen. How small lettering can go in the first place is a different question, covered in the lettering sizes guide.
Securing the thread
Worth a paragraph, because it is why trims are not free. When thread is cut, the next section has to start securely, so small securing stitches go around the cut — tie-off before, tie-in after, also called lock stitches. Wilcom and Hatch both generate these alongside trims, with their own distance trigger separate from the trim one. The consequence that matters here: every trim adds stitches at both ends of itself.
Why your machine may not be trimming
A file and a machine are two different systems, and a trim has to survive both. When the thread is not being cut, the cause sits in one of them and which one is not obvious from looking at the garment.
On the file side: the trim may never have been written, the connector may have exported differently than it looked on screen, or the format may not carry the instruction the way the machine expects. On the machine side: automatic trimming may be switched off, the trimmer may need cleaning or service, or the machine may not support trimming in that context at all — Ink/Stitch warns plainly that not all home machines support the trim function within a color block. Plenty of machines, entry-level ones especially, have no automatic trimming to begin with.
So “my machine does not trim” is not the same statement as “the file is wrong”, and it is worth checking the machine before rebuilding anything.
The DST case
DST is the clearest example of the machine deciding, and worth understanding in outline. Nothing in a DST says “cut here”. The machine watches for jumps arriving back-to-back and treats a long enough run of them as a cut instruction — so the trim is something the machine concludes, not something the file states.
Brother documents this for its PR-series machines: the jump count is configurable from 1 to 8 and ships set to 3, so three sequential jump codes convert to a trim while two are sewn as movement. Brother also makes the important point — the number has to match what was used when the file was made, or you get trims where you did not want them or none where you did. Tajima machines are commonly cited with a different default, so there is no single correct value, and any figure you read is one manufacturer’s setting rather than a property of the format.
Worth knowing too that DST has no published vendor specification. Most of what circulates about its internals comes from implementation behavior, manufacturer documentation like the above, and reverse engineering. Our DST and PES comparison goes into the file itself; how other formats carry machine instructions differently is covered in the file formats guide.
“Loose threads” is four different problems
These get described identically and are not the same thing:
A carried connector
Thread lying across a gap between two parts of the design, because a jump was not cut. This is the one this page is about.
A tail left after a trim
A short end at the point where the machine cut and restarted. Normal, and usually removed by hand.
A thread break
Thread parted mid-stitching. A different problem with different causes — covered in why embroidery thread breaks.
Bunching or looping
Thread gathering underneath or on the surface. This points at threading, tension or the bobbin rather than connectors.
Reading your own sew-out
| What you see | Likely cause family | File or machine? | What to check first |
|---|---|---|---|
| Thread spanning two separated letters | Connector not trimmed, or left deliberately | File, or a design choice | The connector and the letter spacing |
| Machine crosses the gap but never cuts | Trim not written, or not executed | Either | The exported command, then the machine’s trim setting |
| Long thread across an open area | Trim missing, or the machine ignored it | Either | Same two things, in that order |
| Constant stopping and cutting | More trims than the design needs | Mostly file and pathing | Object order and connector settings |
| Short connection under a later shape | Probably a deliberate hidden run | File strategy | Likely nothing — leave it |
| Bunched or looping thread | Often not a connector problem at all | Mostly production | Threading, tension and the bobbin |
Is a visible jump bad digitizing?
Sometimes. A thread lying across open fabric can absolutely mean a trim that should have been there, a sequence that never should have crossed that space, or a connector strategy nobody thought about. Those are real faults and they are worth raising with whoever built the file.
But not every jump is a defect, not every failure to trim comes from the file, not every added trim improves the result, and a certain amount of cleaning up after a sew-out is ordinary production rather than evidence of anything. Wilcom lists hand-trimming as a legitimate way to work.
This is also why “clean back” is worth treating carefully. It is a phrase from the trade rather than a documented technical standard, and no vendor defines it. A tidy reverse side is a reasonable thing to want, and it usually does reflect thought about sequencing. What it does not do is prove the file is well built — density can still be wrong for the fabric, compensation missing, registration drifting — and a file needing a little hand-trimming is not thereby a bad one.
The version of this worth holding onto: a production-ready file trims where a trim solves something visible, routes around the transitions that do not need one, and is built knowing which machine has to run it. If you have a file doing the opposite of that, an existing file can be reviewed and corrected — the sequence and the trim commands are usually the first things to look at.
Ready when you are