A stitch type is a rule for turning a shape into needle penetrations. Wilcom describes it as the software using an object’s outline plus its assigned stitch type to generate the stitching; Ink/Stitch defines it as how a path or shape becomes embroidery. Either way it is a construction decision rather than a style label, and it is decided per object, by a person, before anything sews.
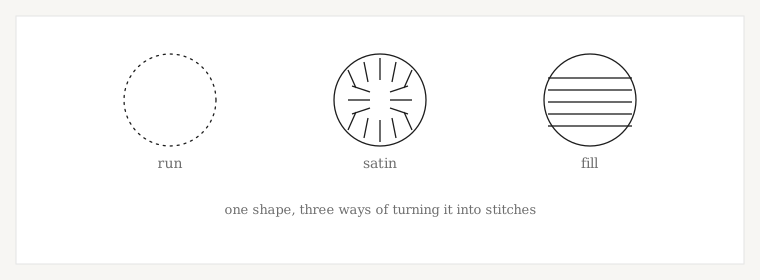
Three constructions do almost all the work: a run follows a line, a satin spans across a column, and a fill covers an area with rows. Worth saying at the outset that this is a practical working model rather than the one true taxonomy — Wilcom sorts stitch types into outlines and fills, Ink/Stitch into stroke, satin and fill, and neither arrangement is wrong.
| Type | Also called | Used for | Stops working when |
|---|---|---|---|
| Run | walk, single, running stitch | Outlines, fine detail, line work | Stitches long enough to snag, or short enough to crowd penetrations into one spot |
| Satin | column, satin column | Lettering, borders, monograms, anything column-shaped | The column gets wide enough that the spans snag or get split, or narrow enough that it stops reading as satin |
| Fill | tatami, ceeding | Larger solid shapes, backgrounds | The area is too small for rows to form, or one angle runs across so much of it that the surface reads flat |
Underlay is not on that list, and that is deliberate. Underlay is a job rather than a stitch type — foundation stitching under the visible object, built using runs, zigzags or tatami. Which is exactly why it is not a fourth entry here. The underlay guide covers what it does and when each kind belongs.
Run
The simplest of the three: stitches follow a path. Wilcom and Hatch call it a run or a walk stitch, Ink/Stitch calls it a running stitch, and it is the same thing in each. It suits outlines, detail lines, fine linework, and any element that behaves like a line rather than a shape.
Its limits sit at both ends of stitch length. Too long and the thread sits proud enough to catch on things; too short and the needle repeatedly perforates nearly the same place, which is hard on both the fabric and the thread. Neither has a universal number, because both depend on the fabric under it.
Bean or triple run is worth knowing as a variation rather than a separate type: the path is stitched over more than once so the line reads heavier. Ink/Stitch documents it under running stitch for that reason. Useful where an outline needs more presence than a single pass gives it.
One boundary worth drawing. A run can be a visible part of the design, which is what this page is about — but a run can also be used simply to get from one object to the next without cutting the thread. That second use is a connector, and it belongs to jump stitches and trims, along with everything about when to cut instead.
Satin, and why it looks different
A satin stitch spans from one side of a column to the other, so consecutive stitches lie nearly parallel with very few needle penetrations interrupting the face of the shape. That is the whole mechanism behind the look: light travels along unbroken lengths of thread, so the surface reads smooth, directional and slightly raised. Break the surface up with penetrations and that goes away, which is why the same thread in a fill looks flatter.
Width is three separate questions
Published satin widths get quoted as though there were one number. There are at least three, they mean different things, and collapsing them is how people end up with rules that do not hold.
What looks and wears well
Wilcom works roughly 10 mm as a recommended maximum, notes that up to about 12 mm works in some situations, and that up to around 15 mm is possible but increases the risk of the thread snagging.
What the software starts splitting
A different question with a smaller answer. Wilcom suggests an auto split around 7 mm to preserve the satin look while improving durability. Splitting begins well before snagging does, so this is not the point at which satin stops working.
What the machine can physically do
Wilcom notes only that machines have a maximum possible stitch length determined by the physical frame movement. It publishes no figure, and neither will we — it is a property of your machine.
So there is no table to build here, and anyone offering one is smoothing over the fact that the workable width moves with the software, the machine, the fabric, the shape and what the object is for. Those numbers are Wilcom’s guidance, quoted as guidance.
The narrow end has even less to offer. No vendor we found publishes a minimum satin width at all. What happens is understood well enough — as a column narrows, the penetrations along its two edges crowd together until the shape stops behaving like a column and a run would do the job better — but where that point falls depends on the fabric, the thread, the machine and the shape. Practitioner figures exist and disagree with each other. Wilcom does provide a minimum column width setting so a file can be held above whatever value you decide on, which is a more useful answer than a number.
Choosing satin does not guarantee one stitch across
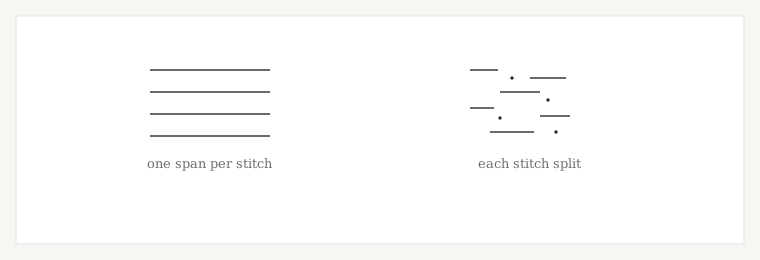
This surprises people. Set an object to satin and the software may still divide the long spans. Wilcom’s Auto Split “breaks long satin stitches into shorter ones” and “distributes needle penetrations in a random pattern so that they do not form a line down the middle of the shape” — the scattering matters as much as the splitting, because a tidy row of split points is visible as a seam. Where the satin effect matters more, Wilcom’s Auto Jump instead “preserves long stitches in an object by turning them into a series of jumps”.
Those are Wilcom’s features and Wilcom’s wording. Other packages handle long spans their own way. The transferable point is that a wide satin in your artwork is not necessarily a wide satin on the garment.
Fill, and where tatami fits
A fill covers an area with rows of stitching. The construction is more familiar than it sounds: as Hatch puts it, a tatami fill is built from rows of basic running stitches laid back and forth across the shape. So a fill is not a different mechanism from a run — it is runs, organized. Each row starts slightly offset from the one before, which keeps the penetrations from stacking up into visible lines across the surface.
Fill and tatami are not quite the same word. Fill is the category; tatami is the standard fill construction inside it. Wilcom gives tatami its own place among its fill options, and Ink/Stitch’s fill category holds a whole set of named types — tatami, contour, guided, meander, tartan, circular, cross stitch and more. In everyday shop talk the two words get swapped freely, and “ceeding” turns up as a third name for the same thing, so you will hear all three used loosely. Worth knowing they are not identical if you are reading software documentation.
Those other fills are variations on covering an area — following a contour, wandering across a shape, running along a guide line — rather than new structures. Naming them is enough here; each behaves differently enough to be a separate decision in the software.
Choosing between the three
A rough starting point: if the element behaves like a line, consider a run. If it behaves like a column — a stroke with two long sides and a fairly consistent width — consider satin. If it behaves like an area, consider a fill.
That gets you to a first answer, not a final one. The real decision folds in the finished size, the fabric it sews on, and the look wanted, and the same artwork can resolve differently at two sizes. A border that is a satin at three inches may have to become a fill at eight, and the change is visible: it will read flatter. That is not a fault, it is the trade-off. Most designs of any complexity use all three, which is much of what makes multi-element custom artwork a different build from a single-color mark.
Two things sit next to this decision without being part of it. Different constructions spread their penetrations differently, which is a density question rather than a stitch-type one, and they distort fabric differently, which is what pull and push compensation exists to handle.
Angle does more than color
Angle is a property applied to an object, not a stitch type of its own — in most software you choose the type, then the angle. It does more work than people expect. Satin catches light along its length, so two shapes in the same thread read as different tones if their angles differ. That is how shading gets built without adding colors, and every color added is another machine stop and more cost.
In a fill, angle decides how the rows lie across the shape, and a single angle held across a large area is what makes it look flat. Changing it between adjacent objects is also how two touching shapes stay visually separate in one thread color.
Geometry pushes back on all of this. A satin column turning a corner has to distribute its stitches around the turn, fill rows have to start and stop against the boundary they are covering, and a run simply follows whatever path it is given. Shape and stitch type are decided together, not one after the other.
What the software calls things
The words are not consistent between packages, which is worth having in front of you when reading documentation:
| Concept | Wilcom / Hatch | Ink/Stitch |
|---|---|---|
| Category for lines | Outlines | Stroke |
| Line stitch | Run, walk | Running Stitch |
| Heavier line | — | Bean Stitch |
| Column | Satin | Satin Column |
| Category for areas | Fills | Fill |
| Standard fill | Tatami | Tatami Fill |
“Zigzag” is the one to be careful with. Ink/Stitch lists a Zig-Zag Stitch among its stroke types and a Zigzag Satin among its satin types. It is also the name of a common underlay, and of an ordinary stitch on a domestic sewing machine. Four meanings, so the word only tells you something once you know which of those is being discussed — and none of them makes zigzag a fourth core construction.
Resizing can invalidate the choice
The construction was picked for a particular finished size, so changing that size can leave it wrong. A column chosen as satin because it was 4 mm wide is a different proportion at double the scale, and a fill that suited an area may be covering something now small enough that the rows barely form. Nobody edited the stitch type; the object it was chosen for moved out from under it.
Whether the software can put that right depends on what it still has to work with — objects it can rebuild from, or only finished stitch data it can move around. The stitch density guide works through what resizing does in each case.
When the wrong type was chosen
These point somewhere rather than prove something. Stitch type is one of several things that could be involved.
| What you see | Stitch-type issue that may be involved | Also worth checking |
|---|---|---|
| Long loose spans that snag | Satin wider than it can comfortably carry, and not split | The software’s split settings, the machine, the fabric |
| A visible line running down a wide column | Split points landing in a row rather than scattered | Object settings, and whether splitting was intended at all |
| A narrow element looking ragged, not smooth | Satin too narrow for the fabric to hold it as a column | Finished size, fabric, whether a run would suit better |
| A small shape looking muddy and over-built | Fill on an area too small for rows to form properly | Density, and the size the element actually sews at |
| A large region with only an outline on it | Run where an area needed covering — a run cannot fill | Whether the shape was ever closed |
| An area meant to be glossy that came out flat | Fill where satin was intended | Whether the shape is simply too large for satin |
What this decides for your file
Digitizing is not tracing artwork. Somebody looks at each element and decides whether it becomes a run, a satin or a fill, at the size it will actually sew, on the fabric it will actually sew on. That decision sets the limits everything else works within — which is why a digitizer will sometimes say an element “will not survive” at a given size. What they usually mean is that the construction it needs cannot be built that small.
Two places where the general rules do not apply. Embroidered lettering is mostly satin columns, and how small it can go is its own question, covered in lettering sizes. And 3D puff uses satin over foam, which is a specialized construction with its own rules — do not carry the widths on this page across to it.
The full picture on how a file is built. What embroidery digitizing is →
Ready when you are